
For Information, maps, trailhead and route descriptions, click HERE.
This was a trip I had been looking forward to, ever since I saw this ridge for the first time in Jan. 2006. I decided to wait until the snow had gone, because I heard that the ridge wasn't of the trivial sort. My neighbour was kind enough to look after my dog, and early this Monday morning (public holiday), I headed towards the Brattvåg region, on the day one month after I visited Urfjellet for the first time.
My friend Petter had climbed this ridge, a week-or-so earlier. He reported fun, airy and exposed terrain. I had been thinking about this ridge every day since then.
I had no clue about where I OUGHT to start hiking from, but after asking a local along the road, I drove to the school at Helland and parked there. The local (an old man) strongly suggested that I should NOT go up to Bergetindane. Especially not alone, and on slippery rock. Probably a good advice, but then I wouldn't have had the great experience, that this trip turned out to be.
I headed out 11:00AM sharp, and was fortunate to find, and follow a vague path (track) across the wetlands, up to and around Ringstadnakken and all the way above the treeline. The track continued, but I didn't pay attention to it any longer. Reaching 550m, it seemed that the ridge traverse could begin. I took a short pause and put on more clothes. Fog was sweeping across Bergetindane, and it was turning a bit chilly. I didn't like the fog, as it would surely make the rocks slippery.


Across Bergetindane
In the route description on the main Urfjellet page, I am refering to four "interesting points" along the ridge. The first point (marked by a pole) could have been bypassed, but I chose to "get on with it", so to speak. After tweaking myself around and over a couple of large rocks, I had entered a focused state of mind.
The next point made my heart skip a beat. Or two. A number of rocks were stacked together, resembling a narrow "bridge". The first rocks looked easy, but not so on the far side. They rocks slanted down to the right, and were still wet and slippery. I remembered thinking that "I don't HAVE to do this", but decided to scramble half-way across and then evaluate. Half-way across, I noticed that it was possible to step down from this "bridge" and walk along it on the left-hand side. And so I did. At one point, I chose to perform a careful jump, but cannot remember if it was related to the "bridge" or the previous section (the pole).
At the third point, the ridge got really narrow (and airy, of course), but I didn't have any problems finding good handholds. This was probably the narrowest part of the ridge.
The "crux"
When I reached the fourth, and most difficult point on the ridge, I got confused. I could see that the ridge made a sudden drop further ahead. Before I got that far, I came to a 2,5m high drop with a pointy rock that made it impossible to get down on the belly and lower myself backwards. Now I remembered that Petter had talked about a jump, and it was clear to me how he had descended. I didn't like this option one bit. Being just SLIGHTLY out of precision, I would hit the ridge in the jump, and bounce off the mountain. I abandoned this idea completely.
I headed back up to the top above me, to investigate an alternative route. There was a grassy ledge down to my right, and if I could get down to it, I could bypass the problems on the ridge. I didn't have the guts to climb it without safety measures, and unpacked the harness and the rope. While mounting the harness, it struck me that I had seen a vague path continue on the other side of the 2,5m drop. The route I was about to attempt was clearly not the normal route. I shuffled my gear into the backpack and headed back to the drop and the pointy rock. I looked around for a route down to my left, but I had no interest in moving into this tremdendously airy (and wet) hillside, and made a commitment to the ridge. In retrospect, I would not have been happy bypassing the ridge, as I really set out to climb all of it.
Back at the 2,5m drop, I considered getting down on my belly on the right-hand side of the pointy rock, and lower myself down backwards. There was just enough room to do so, but I didn't feel comfortable about it. I ended up by sitting down (face out) on the right-hand side of the pointy rock and go for my last option. I took a deep breath, focused, put my left hand on top of the pointy rock, let myself fall while rotating face in and grabbed the pointy rock with my right hand. Now I was in the position I wanted, hanging by my arms, face in, able to look down at the narrow "landing spot" and just let go. I hung there for a few seconds, tasting the good sensation of CONTROL.
I was still on the ridge, and quickly located the place where I could get off the ridge. I downclimbed this section face out, using my arms to lock myself tight down the crack. This was a surprisingly easy climb, compared to the pointy rock affair. Once down, I knew that the problems were over (based on Petter's info). There were still narrow sections that I could have scrambled, but I chose to follow the path that bypassed these sections (without getting off the ridge).
I reached the top of Urfjellet 14:00PM, exactly three hours after leaving the trailhead. I met another hiker on top, and we chatted for an hour. I left Urfjellet 15:00PM, headed (fast) down Ringstaddalen and was back at the trailhead 16:00PM. Nice, round figures and easy to remember.
In retrospect, I am summarising this hike as the most challenging route (given the length) that I have done alone and unroped. No surprise, as I really haven't done a lot of it. It was not a very difficult route in terms of overall climbing grade, but nonetheless I had to exercise good balance, focus, judgement and caution, in addition to the scrambling/climbing. Those things combined were the "main moment" that I took away from this hike. Those who read this should understand the difference between the first and the second climb. Should I do it again, I would traverse the ridge swiftly, knowing where to go and what to do, and without skipping heartbeats along the way.
Note:: Varying picture quality due to broken auto-focus.
Map: I followed routes 5A and 5B on this trip

To Bergetindane


Bergetindane; Point One


Bergetindane; Point Two


Bergetindane; Point Three


Bergetindane; Point Four - the crux


Bergetindane; rest of ridge and up to Urfjellet


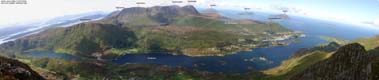


Summit views Urfjellet, 2 parts


Descent


No Javascript:
0 1 2 3 4 5 6 7 8 9 10 11 12 13 14 15 16 17 18 19 20 21 22 23 24 25 26 27 28 29 30 31 32 33 34 35 36 37 38 39 40 41 42 43 44 45 46 47
 westcoastpeaks.com
Other Møre & Romsdal mountains
Other Norwegian mountains
westcoastpeaks.com
Other Møre & Romsdal mountains
Other Norwegian mountains